Sunday 27 May 2018

Making an A frame for a Sailfish 18

I saw some pictures of the aluminium angle A frames on Marika and Brown Owl, and decided to try to make one, in order to make raising the mast quicker, safer and easier.

A frame ready to hoist mast:

The frame itself is made from 25mm aluminium angle, 3mm thick. The brackets are cut from 75mm x 3mm angle, and the bit at the bow that fits over the existing bow fitting is 4" x 1/4" angle.

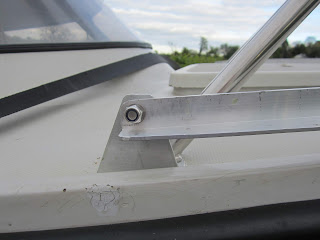
The bracket fits under the back mounting of the pulpit. Unlike the other versions, I made the brackets to be as near in line fore and aft as possible.

Photos of one of the brackets loose on the deck, from different angles:


The starboard bracket after fitting:


Notice how the frame angle iron has been bent in a vice, so that it is parallel to the bracket - otherwise a lot of slop has to be left in the fixing bolt to allow the frame to rotate. This was arrived at late in the process - I should probably have bent it a bit more, so the fixing bolt could have been shorter.

There is another, smaller bend in the middle of the frame, to make it clear the pulpit easily.

The part that fits over the existing bow fitting:


I used 2 pieces of 4" angle - I initially tried to use 3", but it wasn't tall enough. With 4" it completely covers the bow fitting, and extends the full width of the bow, even on the port side (which is larger, because the existing bow fitting is offset to the starboard side).

I made it stick out at the front so I could move the existing bow roller onto the new fitting (although I think I will get a wider roller at some point, as I find the anchor line jumps off the roller onto the nuts). 


I used 3 10mm stainless bolts with nuts to space the sides apart, as this allows for adjustment to make it a perfect fit. I did try aluminium tubing as spacers, but found it too difficult to get them exactly the right length. The other bolts are 1 for the bow roller, 1 for the forestay attachment, 1 for the top pulleys, and 1 to hold the top pulley spacers  

I use a drop pin through the existing holes in the bow fitting to fix the frame in the down position. 

The pulley system:


I bought the pulley wheels on eBay - there is a vendor who obviously makes them any size to order. The lower pulley replaces the old bow roller. Offcuts of aluminium act as spacers, and stop the line jumping off the wheels. The right most bit of rope is the fixed end, and covers a nut which holds the axle bolt in place. The head of the bolt has been cut off, so it does not stick out either side of the old bow fitting. I cut a screwdriver slot in it instead, so I could hold it steady while tightening the nut against the bow fitting.

Triangle holding mast steadying line:


In addition to the teak block I have put under the tabernacle (so the mast can sit horizontal without cracking the hatch), I have added a couple of triangles of aluminium fixed to the cabin top handrail. These hold shackles which line up exactly with the drop pin which holds the mast in the tabernacle. Pre-stretched 6mm halyard line goes from these to the mast to hold it steady while raising and lowering. Because it's line rather than wire, it does allow the mast to move from side to side a little, but it can't fall sideways. I leave these lines, and the stays, connected all the time.

I also re-routed the jib furling line through a pulley and fairlead attached to the A frame, so the length doesn't change when the mast goes up and down.

I keep the foot of the forestay permanently attached to the A frame, so raising the mast only involves rolling it back, attaching the top of the forestay, rolling it back some more (which pulls the A frame to the position shown in the photo), attaching the foot, pulling the A frame raising line (helping the mast up a bit with the other hand to start with), cleating it off, and inserting the drop pin in the bow fitting. Oh, and tightening the stays.

The combination of the A frame, replacing a couple of shackles with clip shackles, and replacing the bolt which used to hold the mast foot with a drop pin, has cut time to launch by about 10-15 minutes.

If you have a Sailfish, or are thinking of buying one, can I heartily recommend the Sailfish Association. A great bunch of people, with a website, forum and Facebook page full of helpful advice.


Friday 19 January 2018

Showing progress of BackupPC backup while it is happening

I have just finished upgrading my central linux gateway box from ClearOs 6 to 7. I took the opportunity to do a complete rebuild, and evaluate what apps I run on it.

I discovered BackupPC is a free option in the ClearOs Marketplace, so decided to try it, as the application I used before, CrashPlan, is no longer free.

It is quite handy, once you have understood how to configure it. I now have it set up to backup the gateway box itself, plus all my PCs. It keeps 3 weeks backups of essential files on a twice-daily basis, so I should be able to recover any version of any file for any day up to 3 weeks ago.

While setting it up, I wanted to monitor the progress of my initial backups, to make sure they were doing what I wanted. Unfortunately, BackupPC does not support this out of the box. The backup log is kept in a compressed file, in a slightly non-standard format.

However, with the aid of a little research, I found the file was just missing the gzip header, so was able to devise a shell script which would show me the log output (almost) as it happened.

Here is the script - call it with the name of the host being backed up, and it will tail the log file continuously.

#! /bin/bash
# Show progress of BackupPC backup
cd /var/lib/BackupPC/pc/$1
(printf "\x1f\x8b\x08\x00\x00\x00\x00\x00" ; tail -f -c+0 XferLOG.z) | gzip -dc | tail -f

Wednesday 25 October 2017

Xamarin cross platform apps for phones, etc.

I am starting to develop an app to run on phones and tablets, and, as I am familiar with C#, I decided to try Xamarin.

 It is an excellent environment, but full of pitfalls for the unwary.

 I installed Xamarin as part of Visual Studio 2017 Community Edition (which is free).

Unfortunately creating a new Xamarin project leaves you with a pile of NuGet packages, many of which are out of date, and some of which are installed in multiple versions.

Attempting to run the automatic update on all of them results in a cryptic error message.

You are trying to install this package into a project that targets 'MonoAndroid,Version=v7.1', but the package does not contain any assembly references or content files that are compatible with that framework. For more information, contact the package author. 

It appears that the versions of the Android NuGet packages you have to use depend on the version of the Android SDK you are targeting. Plus, as supplied, VS 2017 does not include an Android SDK which matches the latest NuGet packages.

There are 2 answers.

Either:

Upgrade your Visual Studio to the latest version, then go into Tools/Android/SDK Manager and update everything. Exit (it has probably updated itself) and re-enter. Repeat until all is up to date. Then make sure you have downloaded the latest SDK Platform. (You need to have all the SDK platforms between your Minimum Android Version and your Target Android Version, apparently.) Finally, adjust your Target Android Platform in your Android project properties, Application and Android Manifest tags, to the latest version. I understand it is best to select a specific version, rather than "Use latest".

Or:

Find the version of the SDK you are targeting, and upgrade all the Android packages individually by hand to the same major version number.

Wednesday 22 July 2015

Setting up ClearOS as a Google Cloud Print server

I have ClearOs 6 running 24/7 as my main Internet-facing router, providing firewalling and routing for my LAN.

I also have a number of Android devices, and it has always annoyed me that Google Cloud Printing seemed to require a Windows PC switched on.

Some Googling revealed that a Linux CUPS server can be made to share its printers with Google Cloud Print. so I decided to try to set this up.

First, I installed the Advanced Print Server into ClearOs, from its Marketplace (it's free).

Then I set up my printer by following the instructions.

Then I logged on to the server as root, using putty.

I downloaded cloudprint from https://github.com/armooo/cloudprint, and unzipped it to /usr/share/cloudprint.

I installed the packages it needs (mostly worked out by trial and error)

yum install python python-pip gcc python-devel cups-devel

pip install pycups argparse cloudprint[daemon]

pip install --upgrade cloudprint[daemon]

cloudprint

(The square brackets are typed in as shown - they aren't code for an optional argument.)

This gave me a url to put into a web browser to add the printer to my Google Cloud.

In order to have this run automatically, in daemon mode, at startup, I added

cloudprint -d

to /etc/rc.d/rc.local 

That was pretty much it (aside from all the messing about finding out what was needed). Note that I did not do everything in one go, the way I have documented it, just installed each bit I needed when I found out what I had didn't work.

Hope this helps anyone else wanting to do it

Thursday 9 July 2015

Thursday 18 June 2015

Free Accounting Software

I have continued to work on my accounting software, while using it in my business and for my personal accounts (in separate databases).

I have added a number of new functions:

  • Import statements from QIF files
  • Copy and paste statement data from bank web pages
  • Investments (shares, unit trusts, etc.)
  • Import data from Quicken
I'm really keen to get some more beta testers - anyone running Windows or Linux want to try a free small business accounting or personal package to run on their own computer, but which they can access from any computer, phone or tablet?


Thursday 9 April 2015

Quick Books replacement

I knew it was a while since I had posted anything on here, but I didn't realize how long! Comes of being too busy, I guess.

In my small business, I have been using Quick Books for years. Although when I started the business I had been working for an accounting software company, I still chose Quick books because it was simple and easy to use - no remembering obscure account codes or customer numbers, everything works by name.

Since upgrading to Windows 8, Quick Books has become significantly less functional - none of the pages that use the Internet Explorer web control work any more - they just come out blank. However, it is no longer possible to upgrade or buy Quick books - you have to subscribe to a web service instead.

Doing this was just not worthwhile for a small business like mine, so I had a look at alternatives. Unfortunately, none of the alternatives I could find would import my existing Quick Books data. As I know a lot about accounting software, and figured there would be lots of people in the same position as me, I decided I should write my own.

I have just completed a beta test version, which has the following features:

  • Imports data exported from Quick Books. Journals are exported using a Quick Books report. The only limitation is that all sub-accounts must have unique names, as Quick Books does not distinguish between sub-accounts and main accounts in its journal report.
  • Does all the basic accounting tasks:
    • Sales invoices, credit notes, payments
    • Customer maintenance
    • Product maintenance
    • Optional Days:Hours:Minutes or Hours:Minutes units on product quantities, to make life easier for people like me who do hourly billing.
    • Purchase invoices, credit notes and payments
    • Supplier maintenance
    • VAT
    • Banking, cheques, deposits, transfers, reconcile
    • Name maintenance
    • Accounting, journals, VAT return
    • Reminders
    • Memorised transactions
    • Import (from Quick Books, CSV or tab delimited files)
    • Data integrity check
    • Backup and restore data to json format
    • Audit trail shows details of every transaction added/deleted or changed
    • Payment history shows details of how each payment is allocated to invoices.
  • Provides helpful features like Quick Books:
    • Names (Customer, Supplier, Cheque payee, etc.) all either selected from drop-down lists, or use auto-complete (type part of a name, and choose the full name from a drop-down list).
    • Choosing an existing name for a payment, cheque, journal, etc. automatically populates the form with whatever values were used last time.
  • Uses either SQLite or MySQL database (set in a configuration file)
  • Runs as a Web Server (on port set in configuration file), so can be accessed by any web browser (Chrome recommended for best usability). Tablet and phone friendly, so you can use it from anywhere with access to the computer running the server.
  • Runs on Windows or Linux (uses Mono on Linux, .Net on Windows).
  • Customisable - the user interface is all in HTML/CSS/Javascript, so if you understand these you can customise the user interface however you like.


    I am therefore looking for people who would like to beta test the software. You get a free copy of the software, along with updates as bugs are identified and fixed. You also get free support via email during the beta test programme. Add a comment here, or contact me via my web site http://www.trumphurst.com.