A frame ready to hoist mast:
The frame itself is made from 25mm aluminium angle, 3mm thick. The brackets are cut from 75mm x 3mm angle, and the bit at the bow that fits over the existing bow fitting is 4" x 1/4" angle.
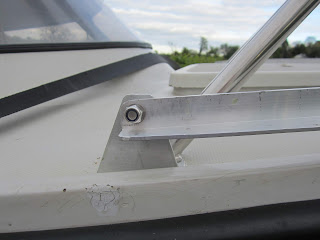
The bracket fits under the back mounting of the pulpit. Unlike the other versions, I made the brackets to be as near in line fore and aft as possible.
Photos of one of the brackets loose on the deck, from different angles:
The starboard bracket after fitting:
There is another, smaller bend in the middle of the frame, to make it clear the pulpit easily.
The part that fits over the existing bow fitting:
I used 2 pieces of 4" angle - I initially tried to use 3", but it wasn't tall enough. With 4" it completely covers the bow fitting, and extends the full width of the bow, even on the port side (which is larger, because the existing bow fitting is offset to the starboard side).
I made it stick out at the front so I could move the existing bow roller onto the new fitting (although I think I will get a wider roller at some point, as I find the anchor line jumps off the roller onto the nuts).
I used 3 10mm stainless bolts with nuts to space the sides apart, as this allows for adjustment to make it a perfect fit. I did try aluminium tubing as spacers, but found it too difficult to get them exactly the right length. The other bolts are 1 for the bow roller, 1 for the forestay attachment, 1 for the top pulleys, and 1 to hold the top pulley spacers
I use a drop pin through the existing holes in the bow fitting to fix the frame in the down position.
The pulley system:
Triangle holding mast steadying line:
In addition to the teak block I have put under the tabernacle (so the mast can sit horizontal without cracking the hatch), I have added a couple of triangles of aluminium fixed to the cabin top handrail. These hold shackles which line up exactly with the drop pin which holds the mast in the tabernacle. Pre-stretched 6mm halyard line goes from these to the mast to hold it steady while raising and lowering. Because it's line rather than wire, it does allow the mast to move from side to side a little, but it can't fall sideways. I leave these lines, and the stays, connected all the time.
I also re-routed the jib furling line through a pulley and fairlead attached to the A frame, so the length doesn't change when the mast goes up and down.
I keep the foot of the forestay permanently attached to the A frame, so raising the mast only involves rolling it back, attaching the top of the forestay, rolling it back some more (which pulls the A frame to the position shown in the photo), attaching the foot, pulling the A frame raising line (helping the mast up a bit with the other hand to start with), cleating it off, and inserting the drop pin in the bow fitting. Oh, and tightening the stays.
The combination of the A frame, replacing a couple of shackles with clip shackles, and replacing the bolt which used to hold the mast foot with a drop pin, has cut time to launch by about 10-15 minutes.
If you have a Sailfish, or are thinking of buying one, can I heartily recommend the Sailfish Association. A great bunch of people, with a website, forum and Facebook page full of helpful advice.


